Jump to Key Sections
You never know when Windows 11 may run into a problem. There can be multiple reasons for these issues including corrupted system files, unsupported drivers, viruses etc. No matter the cause, the result can be devastating since your work/studies can come to a halt because of these problems. But a Windows 11 recovery USB can help you get through these difficult problems, whether they are related to the hardware or the software.
The Windows 11 recovery media is able to locate and resolve all sorts of computer problems even when you are unable to boot into Windows 11 desktop. There are multiple utilities available on the internet which can help you create a Windows 11 recovery USB including one that is already present within Windows 11 by default.
Most of these utilities have various strength and weaknesses, depending on which you need to choose which is the best fit for you. Does it all sound overwhelming? Don’t worry, we got you covered. In this tutorial, we will be covering the 5 most prominent utilities for creating a Windows 11 rescue media, we will be telling you about their pros and cons, and we will also show you how to create a rescue media using these utilities so that no matter which one you choose, you know how to make it work.
Windows 11 Recovery USB Utility
This is the easiest way to create a recovery USB for Windows 11. It is the official tool from Microsoft for this purpose and is already present in your computer, so no need to download any other utility.
However, this is very limited functionality. It can be used to restore from a system image and that’s it. It doesn’t support any 3rd party app either so that you can look for help. Moreover, you will not be able to backup your personal files, or any of the apps that came along with your computer.
Pros:
- Official tool from Microsoft.
- Come with Windows 11.
- Simple and easy to use.
Cons:
- Only restore Windows 11 from backup.
- very limited functionality.
How to Create Windows 11 Recovery USB with Built-in Tool:
Click on the Search icon and type Recovery Drive, then click on Run as Administrator.

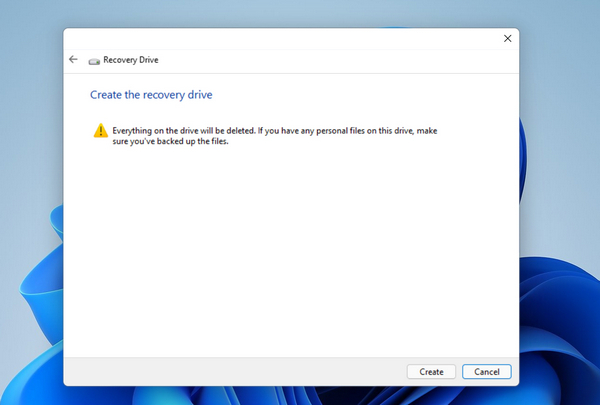
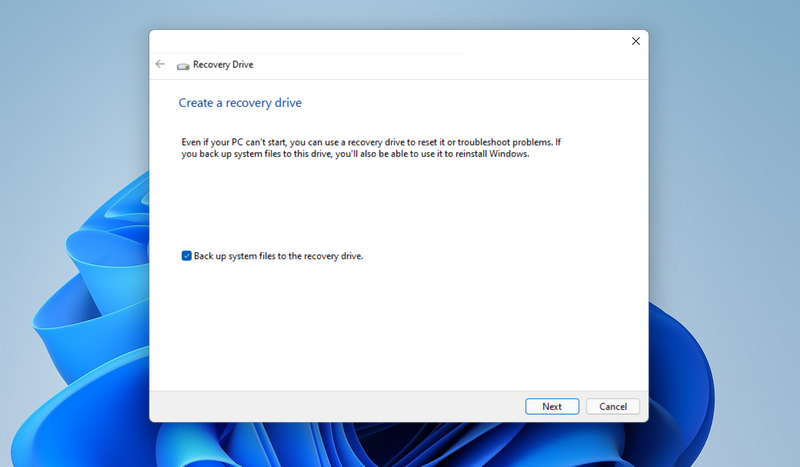
Once the window opens up, click Back up system files to the recovery drive and then Next. Select your USB flash drive from the list and then click Next once again. Finally, click Create.

MediCat USB
Powered by Ventoy, one of the most useful tools for creating multi-boot USB, MediCat USB has the power to create a recovery USB for any Windows 11 computer. It’s free, open-source, and is regularly maintained. It supports both modern Windows 11 computers with UEFI boot, and those that have unsupported hardware.
MediCat has a huge list of supported apps, so it is pretty versatile in nature. It helps you with Windows 11 password recovery (in case you have forgotten your login password), data recovery, and ransomware recovery and even removal of the same. However, it is also this very same reason that makes the ISO file for MediCat pretty large in size. Another drawback for MediCat is its lack of proper documentation/FAQ, and that technical support is available only from their Discord channel. Moreover, to install MediCat and create the rescue media, you’ll need to disable your anti-virus which leaves your computer vulnerable.
Pros:
- Free and open-source utility.
- Regularly maintained.
- Comes with a huge number of useful apps.
- Very versatile.
- Supports both UEFI and legacy BIOS.
Cons:
- Too large in size.
- Technical support available only through Discord.
- Installation is difficult and is geared more towards advanced users.
- Need to disable anti-virus to be able to install it and create the rescue media.
How to Create Windows 11 Recovery USB with Medicat USB:
Download MediCat (https://medicatusb.com/), then insert the blank USB flash drive. Remember to use a USB 3.0 drive with at least 32 GB in size.
Double click on the installer (Medicat Installer.exe file) and it will open a Command Prompt window with details about MediCat and its developers. Press any key on your keyboard to continue from here. Next, it will ask you to disable your anti-virus if you haven’t done that already. Once done, press any key to continue. Once done, it will download some files required by this utility from the internet.
Once the files are downloaded it will show you a software agreement, you need to press any key from your keyboard to continue. Next, it will ask you to install Ventoy on your USB. Select your USB drive from the list and click on Install.

Once done, you’ll be back at the Command Prompt window. Press any key here to continue and you’ll be presented with 4 options.

Press 1 and hit Enter to install MediCat. From here on, just follow the instructions on the screen and you’ll have a rescue USB for Windows 11 with MediCat on it.
Rescue Media Builder by Macrium
Macrium Reflect Free, an excellent utility for backup and cloning hard drive, contains a tiny nifty tool called Rescue Media Builder that lets you create Windows 11 recovery USB for creating backups of data and restoring them in time of need. This can be of great help if your computer has crashed and you have tons of important files stored in it. Using the Rescue Media Builder is pretty simple, which you will see for yourself in a while.
However, it has a non-intuitive user interface which looks a tad bit backdated. If you are new to this utility, you might take some time to figure things out. And the lack of proper documentation adds to the woes. Although, once you do figure out how it works, the utility can be pretty fast as far as its performance is concerned. Also, it lacks any 3rd party apps to go with it that might help in resolving issues other than backups.
Pros:
- Create backup of an entire partition.
- Create backups of individual files and folders.
- Backups can be restored to new computer.
- Support both legacy and UEFI boot.
- Unlock drives encrypted with BitLocker.
- Free for personal use.
- Resolve boot issues in Windows 11.
Cons:
- Not very versatile.
- Not at all user-friendly.
- Simple and easy to use documentation not available.
How to Create Windows 11 Recovery USB with Rescue Media Builder:
Download Macrium Reflect Free (https://www.macrium.com/reflectfree), install it on your computer. Then, insert a blank USB flash drive in your computer and launch the Rescue Media Builder from the list of tools installed with Macrium Reflect Free.
Select the USB drive from the list given in the Select Device section. Ensure that the 2 check-boxes under the USB Rescue Media options are checked.

Click on the Build button located towards the bottom of the window. That’s it, your Windows 11 rescue media has been created. Although, you can go for more customization if you are an advanced user, but this should do the trick in most cases.
AOMEI Backupper
AOMEI Backupper Standard is another backup utility like Macrium Reflect Free, and it too offers a utility to create a rescue media for Windows 11. It not only allows you to create a bootable USB for Windows 11 computer but it would also let you create a Window PE which can be used to boot into the computer even when it cannot boot by itself.
Using this utility, you can backup various files, including system files and entire hard drive partitions. However, a lack of 3– party apps results in limited functionality and scope. You can use this tool to backup data and that’s all you can do. The utility has a few other problems too like an unresponsive UI, and difficulty in backing up files with longer file names.
Pros:
- Clean and easy to use user-friendly UI.
- Support file level backup and sync.
- Pretty fast backup and restore speed.
Cons:
- Issue with longer file names.
- UI may stop responding at times.
How to Create Windows 11 Recovery USB with AOMEI Backupper
Download AOMEI Backupper Standard , install it, insert a USB in the computer, and launch the tool. Once the tool is open, click on Tools, and then Create Bootable Media.

In the next window, select the option for Windows PE, check the box to download the files from the internet, and click Next.

In the next window, select the USB drive and click Next. Finally, click Yes to start creating the rescue USB.
Acronis Cyber Protect 15
Acronis Cyber Protect 15 is a free backup and restore utility for personal use. This comes with a stock feature to create a bootable recovery media for Windows 11. It also help you in rescuing the computer if it failed to boot up properly, backup and restore data from a corrupted system, and create sector-wise data backups from a disk having an unsupported file system.
However, the problem occurs when you have an old computer. This utility can be quite resource hogging. Also, the user interface is not at all user-friendly, and it have been known to crash every often. The customer support is another pain point, they take too long to respond and so, you may be stuck with a non-responsive computer longer than you anticipated.
Pros:
- Free utility.
- No support for 3rd party apps.
- Functionality is limited to backup of data.
- Create Windows 11 PE.
Cons:
- Need a 3rd party app like Rufus to burn the ISO.
- Buggy and non-intuitive user interface.
- Heavy on resources.
- Slow customer support.
How to Create Windows 11 Rescue USB with Acronis Cyber Protect
Open the web console for Acronis Cyber Protect 15, click on the Account icon and then click on Downloads. Under Tools, click on Bootable media to download the ISO.
If this doesn’t work, go to (https://account.acronis.com), look for Acronis Cyber Protect, and then click on Downloads, then go to Additional downloads, and finally click on Bootable Media ISO.
Once you have the ISO file, you can use Rufus to burn the ISO on a USB flash drive.
The Bottom Line
There, now you have all the utilities that you would need to create a rescue media for Windows 11. But which one should you choose? If you want simplicity, go for the official tool from Microsoft. If you just want to backup and restore your system, you can go for Macrium Reflect Free, AOMEI Backupper, or Acronis Cyber Protect 15.
However, if you are an advanced user, and would like to solve issues related to Windows 11 computer other than simple backup and restoring of data, go for MediCat. It is one of the most versatile utilities in this list that is available for free.

